Sunday, May 29, 2011

I LIKE it!

I need to start with some backstory, because I've meant to do about 3 other blog posts before this one and haven't found the time.

I own a scroll saw. I've done a little bit of scrolling, but it's been about two years (the danger of hobby-hopping like I do), and I didn't do enough of it to develop the muscle memory that usually enables my wanton hobby hopping. I've wanted to get back into it, realizing I would basically be starting from zero, so I started working my way through the first lessons in The Scroll Saw Workbook. So far I've made a bunch of sawdust and scrap wood, and these two little guys:

There's no real point to them except to learn how to work a scroll saw.

Well, the thing is, you can't just put a 4 foot board under the scroll saw and work effectively. And cutting a straight line through 6-8 inch wide wood on the scroll saw itself, just not gonna happen. I need a good way to cut blanks down to size.

Now I do have a circular saw, a relatively new edition to my repertoire. But a circular saw is extremely brute force and some of what I plan to cut is on 1/8" stock. I don't see that working. Even on the thicker stock, the circular saw works lovely up until the last foot of board, but then I can't clamp the wood effectively because the motor sticks out too far to the side and is too close to the foot plate to go over the clamps. A foot is still way too big to be working with when your design is only about 3 inches.

So, I found myself still needing an effective way to cut blanks down to size. After examining various options, I decided to try out a basic, inexpensive jigsaw for this task.

Ooh, where has this thing been all my life? I should have gotten one of these things 10 years ago. In fact, I think I've got a new go-to housewarming gift for creative people. Made a nice clean cut across the 3/4" pine/ash/aspen/something available from Lowes that I've been using. I was running the foot plate against a square clamped to the wood and no problems cutting a straight line that way. Don't know that I'd try it across several feet, but cross-cutting a six-inch board, that was fine.

The circular saw will still get plenty of use for bigger projects and 2X4s, but I think the jigsaw is going to be my go-to for cutting scrolling blanks and other small cuts. :)

Sunday, April 24, 2011

Ah, that explains the whining

Not that whining in the Poserverse really needs explanation. It's just one of those inevitable unpleasantnesses like earthquakes or political parties.

First, though, a project pic:

I have seen much wailing and gnashing of teeth that Marvelous Designer puts out triangulated meshes. Now, triangulated meshes are simply lovely for dynamic clothes, but they're not ideal for conforming clothing. I've actually seen a few people state that it is "impossible" to make conforming clothing out of a triangulated mesh -- which is complete bullshit. In fact, in many cases it's not even noticeable unless you're looking at the wireframe.

Unfortunately, the pants here are not one of those cases. I'm getting some unfortunate crunching where the thigh meets the hip, and that's after changing the model itself to raise the crouch seam as much as I could and adjusting joint parameters to the best of my ability. I should probably increase the number of facets and try again, but I just don't have it in me to do that tonight and besides, it'll help but only so much. MD was expecting to have quad mesh output by the end of the month, but they've experience some delays in acquiring acceptable code and may even just code it themselves, which is going to push it out. (Although I don't mind too much; I rather have good than fast.) I may include a dynamic version of the pants whenever I release in order to get around this, at least for Poser users.

The other thing I've been doing this weekend is working on this little cutie:

When I saw Littlefox's new "Peaches" character, I had to have her. Then I had to justify her. I've been stalled out on a character portrait for a while, so I decided to make the character in furry form. :) This particular character is a dhampyr, so I made her a very pale bat. (Yeah, I know, bats don't have six limbs. These are the body parts I have available.)

I'm seriously thinking about concentrating more on the toon figures for a while. (I include Pranx with the toons.) This summer both Poser and DAZ Studio will be coming out with new versions that support weight mapping, plus Victoria 5 is coming out. I have no idea what that's going to do to the realistic figure market; I'm expecting quite a shake-up. But the toons will stay the toons. Even if Cookie and Chip get upgrading rigging, the body shapes will probably stay the same, so work I do now won't be wasted.

Tuesday, April 5, 2011

The Yarn Stash, My Nemesis

My yarn stash mocks me.

While I was at work, I got it in my head that I wanted to knit a hat. Like, today, right now. And I even knew what yarn I was going to use: a rogue skein of something purple-y that I got "just to try out". This right here is the point of a yarn stash, so when you want to cast on a project Right Now, you've got yarn Right There.

In theory, anyway. I got home, checked the pattern... Not enough yarn.

Not enough yarn in ANYTHING anywhere close to acceptable unless it's already pegged for another project. (Wait, the Icewine mittens, do they really use worsted? ::checks:: Dammit, they do. Whoa, at 7 1/2 stitches an inch! Those things are gonna be downright bulletproof!)

My stash, it mocks me.

I won't tell the fiber artists reading not to have a yarn stash, because if you have to be told, you won't listen. But I will tell you that single skeins are basically worthless. (I know you'll listen to me telling you to buy more yarn. ^_~) Most of them don't even have enough to make a hat. Don't bother coming home with less than 200 yards of anything, even if you want to "just try it out".

In the meantime, no hat for me. :(

Wednesday, March 9, 2011

Your Math, It Haz Fail

Son of a...

So, I decide to make these mittens. Pretty, aren't they? And they call for sportweight yarn. Most of my glove/mitten patterns call for fingering, which I do not have on hand except in black and white, but these call for sportweight. I have no less than 3 different colors of lovely free trade sportweight alpaca.

Now, the pattern does say finished size is 7.5" around the palm, and my hands are 6.75ish. But I can squeeze the gauge down to 30 stitches/4 inches, and then I'll get a nice dense winter-worthy mitten instead of "when it's chilly but still not cold enough".

Problem is, the pattern lies. Lies, I say!

Gauge is 27 stitches/4 inches. Stitch count is 64 stitches. 64 / 27 * 4 = 9.5 inches, NOT 7.5. Yes cables shrink up a bit, but surely not 25% on a pattern that open.

In order to make them fit my hands, I'd have to knit at 9.5 stitches per. I do socks with fingering at 7-8! I can't cram sportweight that tight!

Dammit. Guess that pattern gets bumped out of my queue. I have no idea what I'm going to take to knit night tomorrow now.

Monday, March 7, 2011

First Impressions - Finished and Live!

The First Impressions dresses are finished and uploaded!

First Impressions Dresses

The dresses work in both Poser and DAZ Studio, although Poser has additional features. (As you may or may not recall, DAZ Studio roundly kicked my ass.) The Victoria versions both support a painful (for me) number of full body morphs. Victoria 4's includes Aiko, Stephanie, Girl, and She-Freak, as well as some of their variations.

If this is your thing, you can download them from ShareCG at these links:

First Impressions Outfit for Cookie

First Impressions Outfit for Victoria 3

First Impressions Outfit for Victoria 4

Happy Rendering!

Saturday, February 26, 2011

You know what this is?

First Impressions Dress Promo

This is a promo image. Yes, the now-infamous First Impressions Dress, which was all finished back in December except for packaging and promo images, might actually go live within our lifetimes!

I'm tempted to put all three of them into one download package and make people just delete what they don't want, but that would do mean things to download times. I might put the two Victorias together, however. Whichever way I go, I better get things packaged fast before I drop it again.

Also, a note: I am always annoyingly slow at CG, but having the cold from hell doesn't help matters. :P

Thursday, February 24, 2011

I'm Dubious

I did go ahead and get the Noro Silk Garden for my arm warmers, because there really wasn't an alternative. The next closest option was 30% wool. Interestingly my LYS does have a self-patterning non-wool yarn in worsted weight, but that would have been too busy for my project.

BTW, my project:

Honestly, IMHO, this pattern is not all it could be. First, the reverse stockinette background is too wide. If I were designing it, I'd leave one purl stitch on each side only, not two. That's why I don't like ones done in solid colors. The Noro gradient helps add some interest; without it, there's just a huge expanse of ass-ugly reverse stockinette.

The designer also does not consistently twist her traveling stitches. I've changed that as I knit.

What makes me very dubious, though, is that this has the shortest thumb gusset in the world. Only 7 rows. Having made a mitten or two in my time, that seems waaaay too short. Normally I would work a plain row between each increase row to get more length. I'm sure I'm reading the pattern correctly, though, because I checked. Then I checked again. Then I checked a third time. Then I squinted at the sample photo and counted rows. Then I flipped to the other sample photo and counted rows again. Then I went to Ravelry and counted rows on some of those photos. Then just for good measure I double-checked the errata, and then clicked some more Ravelry photos. Because it really doesn't seem right.

I am really quite convinced that the pattern intentionally has the shortest thumb gusset in the world. I'm not convinced that's going to be comfortable, however. Actually, I'm wishing I'd put in a lifeline before starting the gusset, and I may frog back anyway and add the increase rounds. These are going to be so long on my fingers that I've got room to do it, although unfortunately it'll make the cuff even longer. Gosh, I hope this yarn'll frog. It's got an awful lot of mohair in it.

Sunday, February 13, 2011

Mmm... Fresh baked bread

I haven't done a "creative stuff" post in a while, because the last couple of weeks I've been knitting dishcloths. Ooh, exciting. :P They're not even fancy dishcloths; they're just mitered squares with dishcloth cotton.

So instead I will talk about fresh baked bread. Mmmm... Whenever I make bread at home, I always wonder how they can call the stuff in the store "bread". It's just so different from real bread.

Now, although I like to cook, I'm also quite lazy, so I've been using this No Knead Bread recipe from Hillbilly Housewife. Don't worry about the "2 or 3 hours" in the title; your actual kitchen time will be maybe 15 minutes, and that's if you take your time mixing the flour in. Mostly it's just waiting for the yeast to do its thing, and you can go do other stuff while you wait. (In fact, I suggest it. Yeast isn't that interesting to watch.)

A couple of notes if you try the recipe:

  1. It's not a very firm dough. Actually, it's kind of slimy. If you get something that with the consistency of silly putty, but sticky, that's fine. You haven't done anything wrong, and it'll still come out good. (If you get something more like normal bread dough, that's fine too. It's a forgiving recipe.)
  2. Be sure to rinse the dough off everything before it hardens, or it's a bitch to get off. (BTW, the sink strainer counts as part of everything.)
  3. Expect the towel you cover the rising bread with to get a little goopy. Sticky silly putty rising toward it.
  4. If you put sesame seed on top, it's really good, but unlike store-bought bread, the sesame seeds actually impart a taste. Be prepared for that.

And of course as an extra perk, when your make bread, your whole house has that wonderful fresh bread smell. (Well, my little open-floorplan house does, anyway.)

Sunday, January 23, 2011

What happens when you cross hamsters and jellybeans?

Hamsterbeans!

If I do another one, I'm going to get safety eyes or beads or some other way to give it shiny black eyes. Unless I make it as a cat toy, that is. (Horrors!) He's a quick knit, but very cute in person.

And I was on a roll today, so I finally got this little guy's eyes sewn on:

The sad part is that it took longer to put everything away than it did to sew on the eyes, but I'd put it off anyway. (Most googly eyes are glue-on, but I don't like using glue on fiber crafts. It's usually messy, the hold is often short-lived, and if I'm going to spend so much time on something, I prefer to use archival supplies. Even if it's a purple-and-pink octopus. :) )

Because I have so many hobbies and can go so long between putting one down and picking it up again, someone once asked me if I forget how to do them in the meantime. No, not usually, because most of them are muscle memory. For example, long before I was an avid knitter, I was an avid crocheter. I don't think I've picked up a hook (except maybe to rescue a dropped knit stitch) in 10 years before today, but lookit me go! Doin' tricks and everything.

The stripes are independently spiraled. The two colors never join horizontally anywhere; they only run on top of each other. (You can do this in circular knitting, too.) I also learned the magic ring start.

I have a metric buttload of pearl cotton that I got for crazy quilting, only to find I hate embroidering with it. It's just too thick; it's hard to pull through multiple layers of fabric. Now I want the box it's stored in for other stuff, so I was looking for a way to use it up and found a hacky sac footbag pattern I liked. I'm probably going to go up a hook size for the next one. This one came out kind of small and light. Mara (one of the cats) is playing with it right now, which probably wasn't such a good idea on my part. Mara's fine, but if Angel gets hold of it she'll chew it open and get plastic pellets everywhere, plus now they're going to be stealing it off my desk. Maybe I should take it to work as a stress ball.

Anyone else play Hacky Sac when you were a kid? I was never good at it per se, but I could do well enough that the guys would let me join in. I could usually successfully get it to someone else in the circle, even if I couldn't do tricks very well.

Saturday, January 22, 2011

I don't think I ever showed this off

It's my wonderfully geeky Spiderman blanket! I finished it like a year ago, and even took the photo then, but just never got around to posting it. So w00t! There it is!

Friday, January 21, 2011

I shouldn't have done that.

I finished spinning the purple/pink silk I was working with. Yum, chock full of fibery goodness:

Of course, I'm planning to two-ply that, so I needed to get half of it onto another bobbin. Unfortunately, I don't have a bobbin winder, because I just haven't been able to bring myself to spend that much. I do have an eggbeater drill, but would you believe I do not have a single dowel rod that would correctly fit into either my cardboard storage or my old non-WooLee Winder wheel bobbins? All the dowels in this house, and yet not one is the right size.

So, I figured I have enough WW bobbins, I can use the WooLee Winder. I set up the wheel for Irish tension (brake band on the flyer), braked the flyer nice and hard so it wouldn't move (and thus wouldn't add or remove twist), put the drive band on the bobbin and started treadling.

This was a mistake, because no other method will ever be acceptable again. A bobbin winder with a travel screw! Why hasn't someone made this? It has to be what industry uses, or something similar. I want one! And if I can't have one, continuing to use the WooLee winder in this manner is extremely tempting. (However, since I only have 4 WW bobbins, I think I will at least go get a dowel that will fit into the cardboard bobbins, for storage purposes.)

Here's the divided singles, on the Kate and ready for plying:

I love the background in that pic because it's the most delightfully geeky thing.

Finally, I promised pictures of the Ishbel scarf. Here it is on the blocking wires:

I wasn't super fastidious when laying it because it's meant to be a functional winter scarf. It'll get crumpled almost immediately.

Saturday, January 15, 2011

Made it with three feet to spare!

And as you can imagine, that had me pretty nervous as I was binding off the Ishbel scarf. Normally I'd do an Estonian bind-off on an item like this, but there was no way I would have had enough yarn for that. The bind-off the pattern called for came out a little tight, but I think it'll be OK once it's all blocked out. Alpaca grows.

I hope to get it washed and blocked tomorrow or Monday, so pictures then!

Whadaya wanna bet?

I've got three rows and the bind-off left on my Ishbel shawl, but I'm also swiftly approaching the end of my ball of yarn. What do you wanna bet I run out in the middle of the bind-off? :P

Friday, January 14, 2011

Need googly eyes

For this little guy:

Knit Octopus

I actually have googly eyes for him; I just haven't gotten around to sewing them on yet. Hopefully this wonderful glorious long weekend coming up.

This is one of Hansi Singh's designs. It's included in Amigurumi Knits, as well as available individually on Ravelry. Hansi's stand-alone patterns are really awesome; she goes into so much detail. You will never find professionally published patterns as good as Hansi's self-published ones. Professional publishers just won't dedicate that much space for that much detail on one pattern.

And I'm on the last section of my Ishbel scarf. (No pictures. Unblocked lace looks like ass.) It's going very quickly, so maybe I'll get it done before the cold weather is over, and can actually use it this year. It looks like I might end up with two full hanks of Cascade Alpaca Lace left over, too. It's only taken one (doubled) so far and I'm not done with that hank yet.

Quote of the Day:

"Selfishness is not living as one wishes to live, it is asking others to live as one wishes to live." ~Oscar Wilde

I might also add "demanding others provide you with the life you wish to live" to the "selfishness" definition, after some of my life experiences.

Friday, December 31, 2010

Hee hee

Listening to me go through my stash of spinning fibers must be funny. "Hankies. More hankies. Ooh, other hankies. Hey, still more hankies!"

I really like silk hankies.

I'd forgotten how much awesome stuff I have in my spinning stash. It's mostly silk in various forms and alpaca, with a few other fibers. One of my cats is allergic to sheep's wool, so I'm mostly wool-free, but... Well, I'm not a saint. There's a hand-dyed braid of roving in there that I got just before she was diagnosed because I had promised it to myself after finishing something or other, and want to keep that. There's a huge ball of a beautifully dyed English Longwool I won as a door prize one year at a kinda-local fiber guild event. Then a few odds and ends with some significance.

Mostly, though, I've got a lot of silk in various forms, a lot of alpaca in various forms, and a whole lot of sheep-free, brightly colored fibery love. :)

Thursday, December 30, 2010

I love my spinning wheel

This is not a new phenomena. I've had my spinning wheel for, oh, I guess it's right about two years now. But I probably haven't used it for about a year. I pulled it out again yesterday and starting working on it. Ooh, this is fun.

Union rules require that I post a picture of the singles on the bobbin:

This is some silk top I had. I suspect it may have been the leftovers of two or more dyeing batches. Some pieces of it are very bright pinks and purples and fuchsias, while others are a more subdued grey-purple and grey-indigo. When I started it spinning it, a year or a more ago, I had a plan on how to manage the differences. Damned if I can remember what that plan was now. ::shrugs::

I figure I'll spin it until I run out, divide it onto two bobbins and make a two-ply. For other animal fibers I prefer 3 plies, but I generally two-ply silk. That structure shows off the sheen of silk well, plus you get more yardage. Silk is only going to fluff up so much, so I don't find that a 3-ply has much advantage.

Now I need to find the silk hankies I was halfway through, pull out one of my (great many) pretty drop spindles and finish it up. I do remember what I was doing with those. They were a blue-green mix with the ones on top being more green and the ones on bottom being more blue. I'd split them in half by color, and planned to ply them together to get a mixed blue-green effect.

Wednesday, December 29, 2010

Just a peek at what I'm doing

I know, I know, I still haven't gotten the First Impressions Dress packaged and posted. The sad part is I've basically just got to make a download thumbnail (well, three), and I just can't bring myself to do it. I really do what to get it done before my vacation is over, though.
In the meantime, though, here's a peek at what I'm doing now:

I love working with Pranx. He's just such an adorable figure, and the fan base is pretty cool.
There's also going to be a coat with this set. I'm still deciding whether I want to add a vest, too. I plan for each piece will be separate so you can mix and match. I'm not sure if that'll make it more prone to poke-thru when conformed, though. In theory it shouldn't, since they'll all have the same joint parameters, but Poser doesn't always act according to theory.
On a different hobby, I started an Ishbel shawl (well, actually scarf) some time ago because the center stockinette portion is good waiting room knitting, and I started the lace portion earlier this week. No pictures yet, but I'm excited to say that it's going very quickly, especially for lace. I'm already on the third pattern section out of five. :)

Saturday, December 25, 2010

OMG, Entrelac Sheep!

Lookie lookie lookit!

If you don't have a Ravelry account, you can lookit Chemknit's, or go to the Amazon page for Norwegian Handknits, click "search inside this book" and search for "Entrelac Sheep".

I got the book Norwegian Handknits for Christmas, and as you may have guessed, I adore the pattern for the entrelac sheep! They're so cute! This is a thing which must be made.

Tuesday, December 7, 2010

Tutorial: Getting Marvelous Designer stuff into Poser at the proper scale

OK, today we got a tutorial. One of the things that MD users modeling for Poser have struggled with is getting models from Poser to MD and back in the proper scale. See, the problem here is that in most 3D programs, 1 unit represents a real world inch, or a centimeter, or a millimeter. In Poser, 1 unit represents 103 inches, or 8.6 feet, or 261.6 centimeters. I'm sure it made sense to someone at one time. OK, that's a lie. I'm not convinced that has ever made sense to anyone, anywhere, anytime. However, it's what we got, so we have to work with it.

Poser's stupidly small scale causes all sorts of problems when we try to play with the rest of the 3D graphics world, and MD is just an example of that.

Now, I generally use the free program Objaction Scaler, so that's what I'll be assuming for this tutorial. (BTW, sorry about the artifacts on the screen caps. I didn't realize they were saving that way until I was done with everything.)

1. Start in Poser. Load up the figure you want to make clothes for. Turn off IK, and completely zero the figure. If you're ultimately going to be making conforming clothes, you might want to use PhilC's "Super Zero" script if you have it or even start with the figure's OBJ instead of exporting from Poser, to make absolutely sure you have everything zeroed. If you're doing dynamic, the zero within Poser is what you want to match.

2. On the menu bar, go to File->Export->Wavefront OBJ...

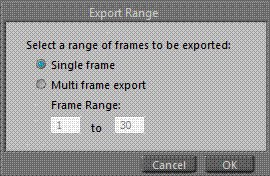
3. Poser brings up a dialog box asking what frames you want to export. Select "Single Frame".

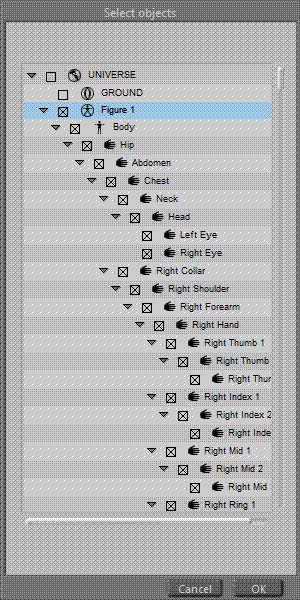
4. Next comes the "Select objects" dialog box. Make sure only your figure's bodyparts are selected. You can do this quickly by clicking the box beside "Universe" to turn everything off, then selecting the box by your figure name.

5. THIS IS THE FIRST IMPORTANT PART. Next you come to export options. If you are making dynamic clothes, do not check "As Morph Target". You can do what you want with the others, but leave this off.

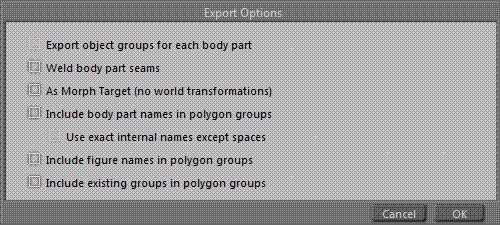
If you are making conforming clothes, DO check "As morph target". If there are any hidden offsets, you want to match them.

6. Save your figure. You might want to save the Poser file at this point, so you can come back to it later instead of having to do all the zeroing and IKing again later. Open Objaction Scaler.

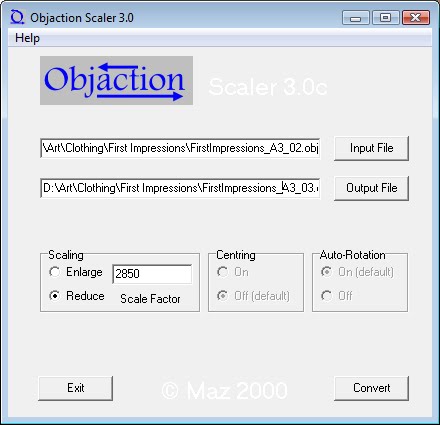
7. In Scaler, chose the figure you just exported as your input, and provide a new name and file path for your output. I always click the "Output File" and then treat it like any other save dialog to do this. It sometimes wigs out if I just type in a new file name/path.

Under the scaling factors, put in some ginormous number. Generally speaking for a typical figure, like Victoria 4, you'll want around 2500. It doesn't matter, but remember this number. I make it part of the output filename so I can reuse this avatar easily later without going "crap, how much did I scale that by" later.

(For the example, I'm exporting Aiko 3. She's pretty petite compared to the Vickies, but I want to use the same patterns for her that I do for them, so I'm making her larger than normal.)

Once everything's set, click the Convert button. It should finish pretty quickly.

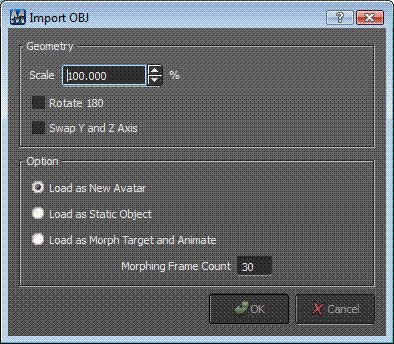
8. OK, enough with Poser. Now we're heading over to Marvelous Designer. Once it's open, go to File->Import->Obj and select the figure you scaled up in the last step.

9. THIS IS A REALLY IMPORTANT PART. Import your embiggened obj at 100% scale, and load as new avatar. Again, do not change the scaling. Leave it at 100%.

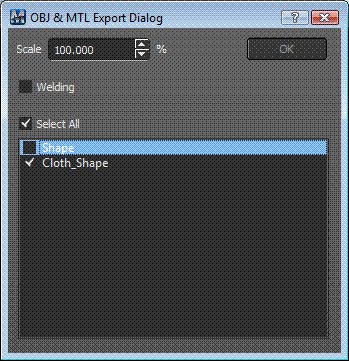
10. Do your stuff in Marvelous Designer. When you're done, go to File->Export->OBJ, and give it a file name for your awesome new outfit.

11. THIS IS ANOTHER IMPORTANT PART. In the export options, export at 100% scale. Don't try to change it in MD. Also, you'll want to uncheck "shape" on the list. That's your avatar; she doesn't need to come along for the ride.

12. Time for another round in Objaction Scaler. Load up your awesome new outfit. Give it a new filename in the output box. Now, under scaling, put the same scaling factor you used for your avatar, but this time click the "Reduce" button. Click convert when you're ready.

13. I usually make a pit stop through UVMapper at this point to lay out the map like I want. All the pieces are already laid out flat for you like your pattern (which is beautiful mapping for clothing, BTW), but they're out of the 0-1 range, overlapping, and may not be in scale to each other.

Hint 1: When you bring it in to UVMapper, do not select "yes" when it asks if you want to correct out of range data. Instead let it bring it in huge, then select all and use the '/' shortcut to scale it down until it fits on the map. This keeps everything square, and then you can rearrange things and scale them relative to each other without distortion. If you let UVMapper do it, some of your pieces could end up squished in one dimension, but not the other.

Hint 2: If you don't change the pattern, MD exports the same vertices in the same order, even if you've fit your outfit to a different figure. So if you're fitting to a bunch of figures like I do, you only have to map one, and then you can import the rest, go to File->Import UVS, select the one you mapped and click OK. Identical mapping, no work. (If you had to change the pattern, though, no such luck. The mesh will be different.)

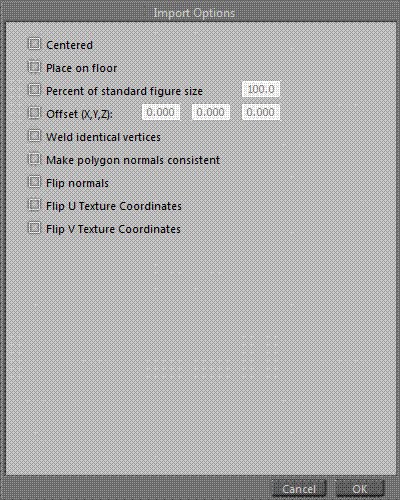
14. OK, back in Poser. Either open the file you saved when you made your avatar, or again load up your figure and zero everything. Then go to File->Import->Wavefront OBJ... and select your reduced size and optionally UVMapped

15. THIS IS THE FINAL REALLY IMPORTANT PART. Uncheck everything in the import dialog. Don't scale, don't drop to floor, don't do anything except import your outfit.

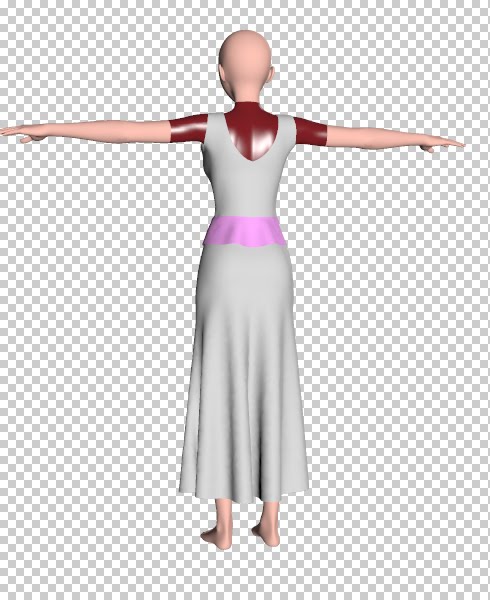
16. Ta-da! Your outfit fits. You're ready to clothify it, group it, or whatever you'd normally do at this stage.

Everything's fine in the back, too, in case you were worried.